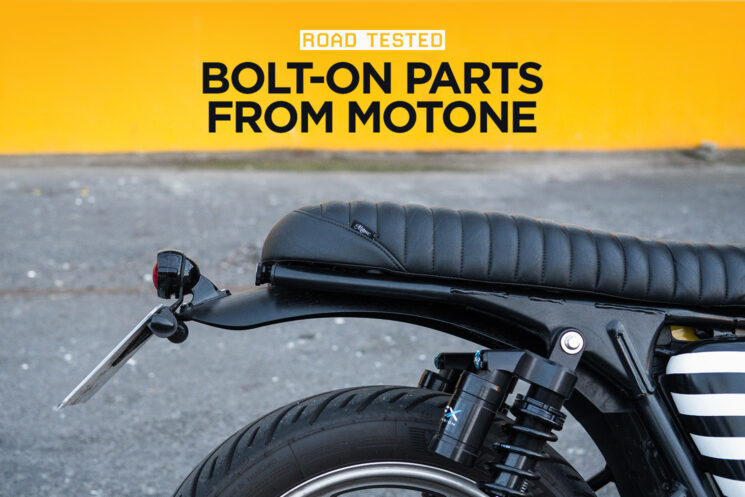
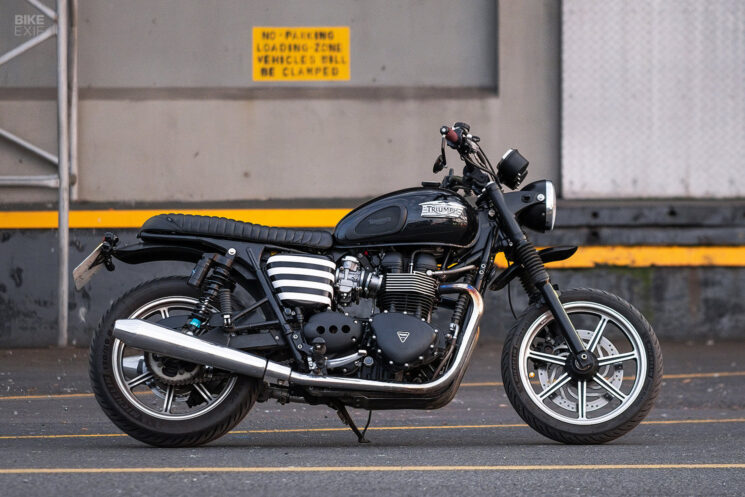
“This is not a project bike” is a lie I frequently tell my significant other. But the truth is, I can’t help myself (and she knows it, judging by how she rolls her eyes). Although my 2012-model Triumph Bonneville SE is a handsome enough motorcycle out the box, it looks even better when you gradually start ditching the factory frou-frou.
I have no desire to take an angle grinder to the Bonneville’s frame, nor do I have the time and money to cover it in scratch-built parts. So this project is all about big wins from small changes—the type of stuff that can be done in an afternoon over a few beers. These goodies that Sam at Motone Customs sent over tick that box.
Based in Newport, Wales, in the United Kingdom, Motone produces a pretty substantial catalog of universal and model-specific parts. Although they focus on multiple marques, they have more Triumph-specific bits than any other brand, covering everything from early-2000s carburetted Bonnevilles right up to the new liquid-cooled bikes.
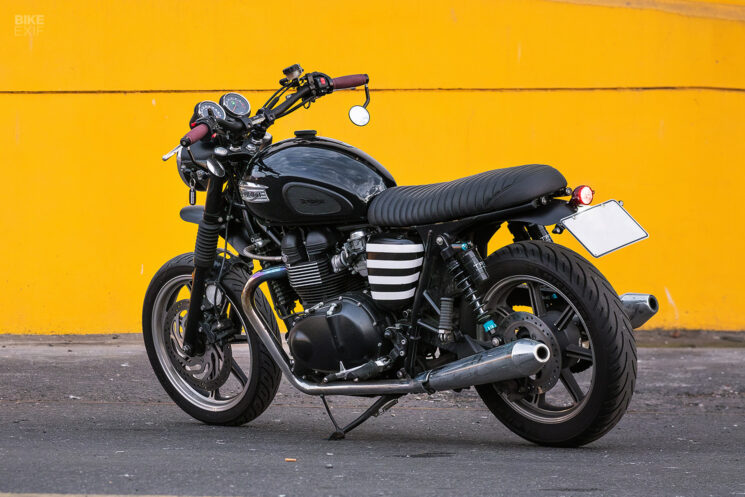
The box that landed at my door contained replacements for most of the parts that I didn’t like about my Triumph Bonneville SE—its broad seat, giant plastic fenders, and the cheap turn signals and taillight that the previous owner had fitted. It also included a handful of brackets and wiring accessories, a few more dress-up parts, and a couple of truly practical upgrades.
It took no more than a few hours to fit everything to the Bonneville, using just a 4 mm Allen key, 8 mm and 10 mm sockets, and a Phillips screwdriver. I did reach for a drill and a file too, to lightly modify one or two parts—but everything else went on with minimal fuss.
It’s worth mentioning that most of these parts came without detailed instructions since they’re typically very straightforward to install. But there were a couple of instances where logic failed me, and I had to turn to the internet for help. That said, nothing shown here requires a degree in rocket science.
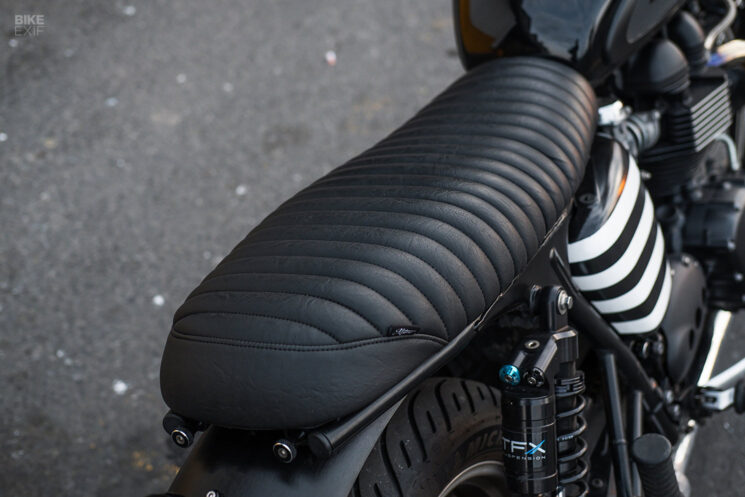
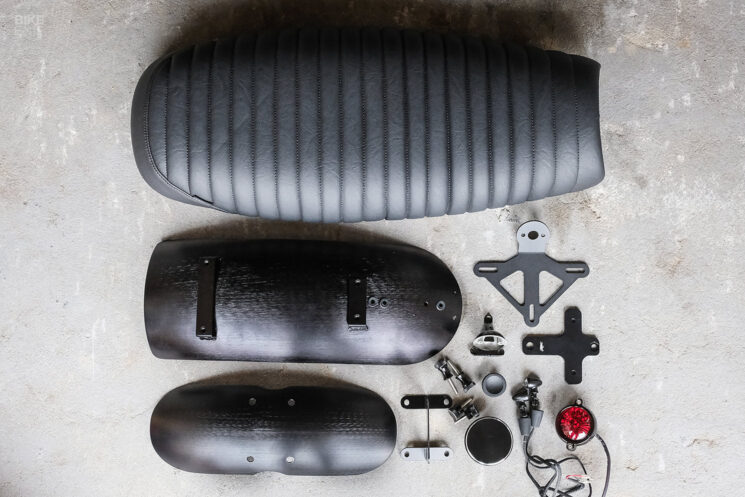
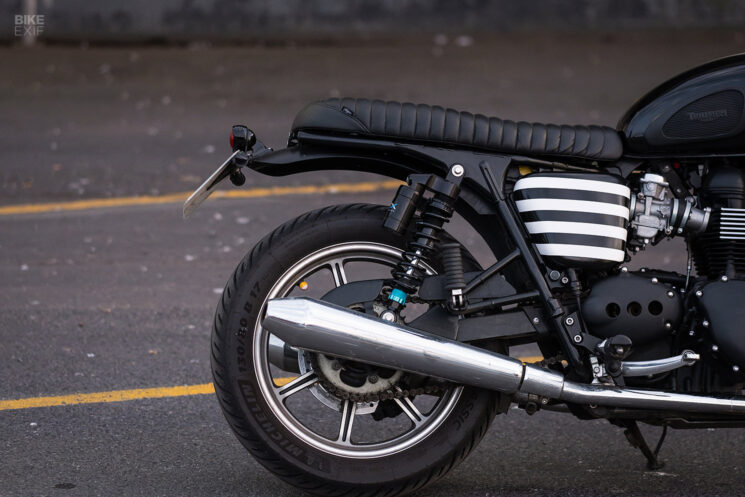
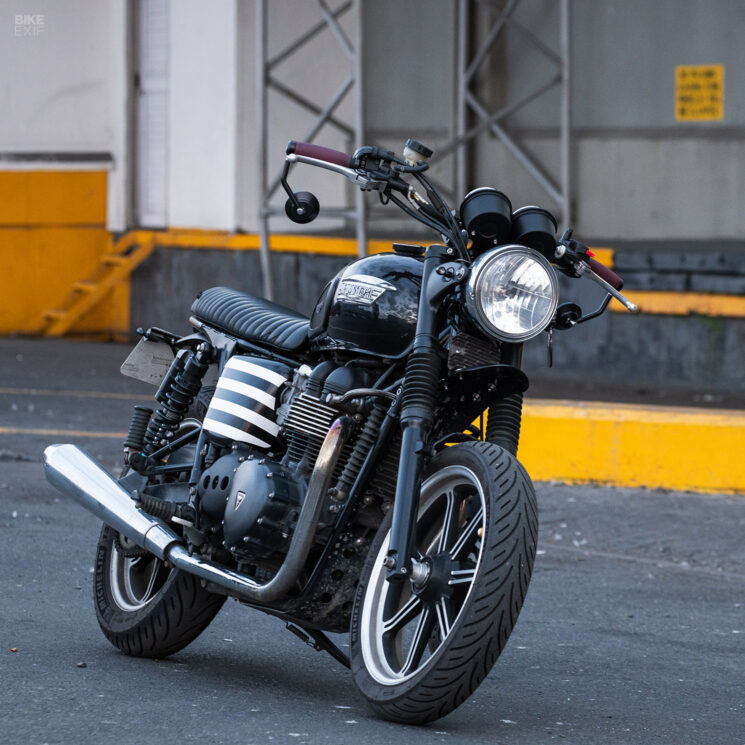
Motone Skinny Krait seat Covered high-grade vinyl with a traditional tuck-and-roll stitching pattern, the Motone Skinny Krait seat cuts a much slimmer profile than the Bonneville’s bulky stock perch. But despite this, it’s more comfortable—and actually sits an inch or so higher.
That’s because the Bonneville’s stock seat is less padded than it appears; its sides extend down to flank the frame rails, creating the illusion of a thicker build. The Motone seat not only sits on top of the frame rails (which looks a whole lot better), but features more padding with superior foam. Although I wouldn’t call it a touring seat, it’s both an aesthetic and practical upgrade over the original.
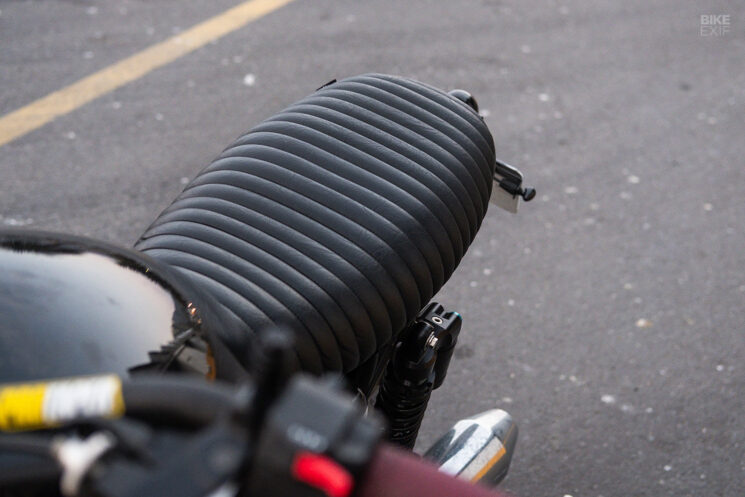
It’s narrower too—which, combined with its marginal height increase and bench-like design, makes it easier to move around on the bike. (Together with the high-and-wide handlebars I’ve fitted, the riding position is now damn near perfect.) It’s long enough to accommodate a passenger too.
But the Motone Skinny seat’s biggest selling point is how easy it is to fit. Its injection molded seat pan is a copy of the stock Triumph part—so it can be swapped in literal seconds.
Motone sent over a pair of their knurled ‘quick-release’ seat bolts as well, which are much easier to use than the hard-to-access fasteners that the bike comes with. (If you haven’t had the pleasure of owning a Bonneville, they’re domed Allen head bolts that sit deep below the lip of the stock seat—and everyone hates them.)
Motone’s ‘quick release’ screws feature a CNC-milled body with an integrated stainless steel hex bolt. You can tighten them a fair amount by hand, and then cinch them down with an Allen key. And even if you tighten them too much to be able to remove them by hand, they’re much easier to access than the stock bolts.
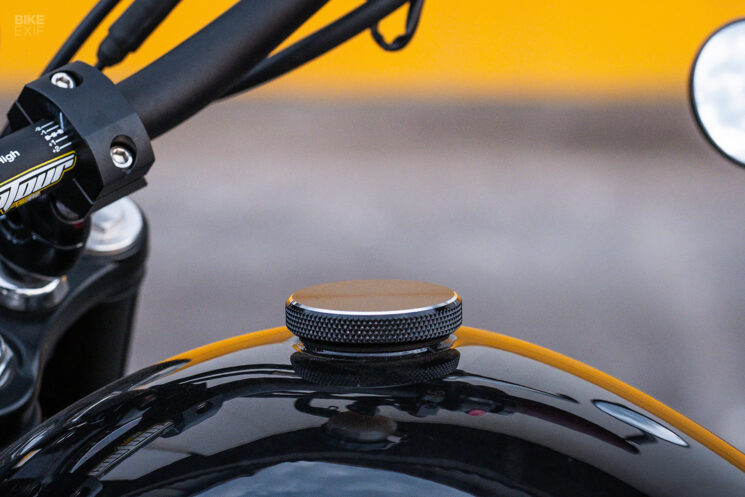
Motone sells these in a variety of finishes, but I picked a black set, featuring subtle contrasting details. This design is repeated in the Motone fuel cap and quick-release side panel fasteners that I also installed, creating some visual consistency across the bike’s details.
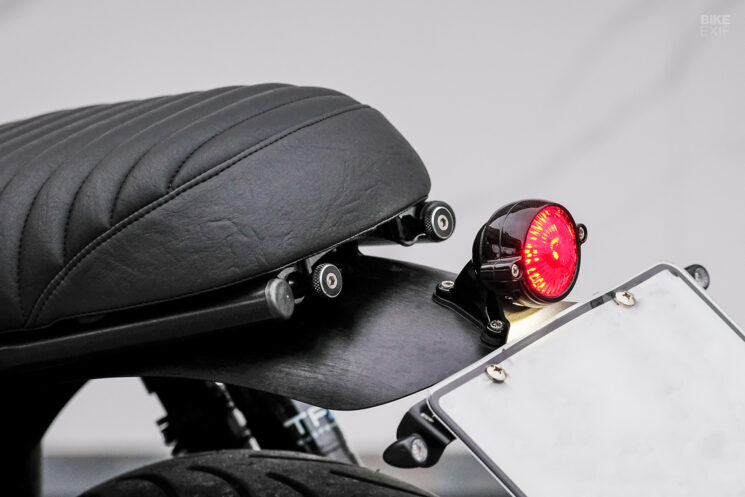
Motone High-Tail rear fender Fenders are a controversial topic around here, but I had a clear idea of what I wanted for my Bonneville’s derrière. Not keen to go fenderless, I wanted something slim and tidy that would be significantly shorter than the stock part, but still long enough to accommodate a taillight and license plate mount. It also needed a sharp exit angle, so that it would float neatly over the rear wheel with the extended TFX shocks I’m running.
Motone’s rolled aluminum High-Tail rear fender ticks those boxes. It’s about as short as it can be, while still adding a modicum of practicality to the tail end of the bike. Available in polished and brushed versions, it also comes in a unique finish that employs black anodizing over a brushed base—as pictured here.
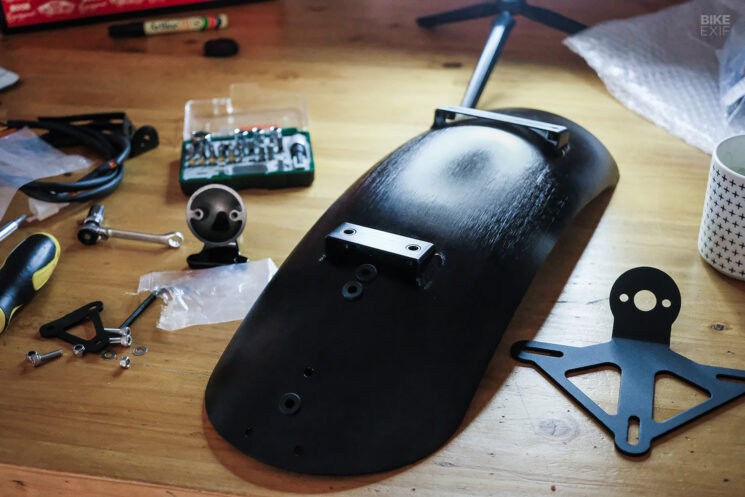
The top of the fender sports two brackets with threaded lugs that perfectly replicate the mounting points on the Triumph’s OEM fender. So, as with the Motone seat, the High-Tail fender is a straight swap (although I did need to muscle it into place where its front edge meets the bike’s plastic air box).
The back edge of the fender is pre-drilled in a triangular pattern that matches all of Motone’s taillights, with a handful of grommet-lined holes for routing wires through. What it lacks though, are clips underneath it to hold the rear assembly’s wiring harness in place—a small, but brilliant, feature that’s found on the stock part.
To get around this, I drilled a couple of small holes in the area of the fender that’s obscured by the seat and ran a cable tie through there. It’s a simple enough mod, and, to be fair to Motone, there’s more than one way to route your tail section’s wiring—I just prefer doing it this way.
That single gripe aside, the Motone High-Tail fender fits great and looks tons better than the cumbersome original. It’s one Bonneville modification I would highly recommend, especially if you’ve already replaced the bike’s seat with something more svelte.
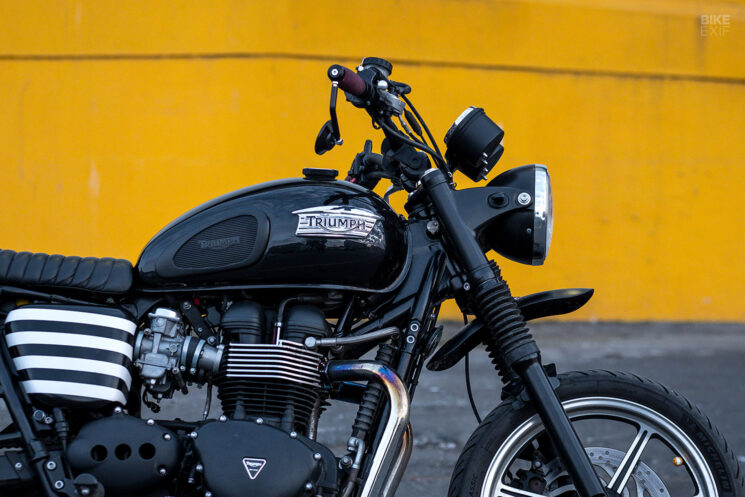
For the opposite end of the bike, I settled on a Motone Shorty fender in the same brushed-and-anodized finish as the rear fender. I also picked a high-mount bracket, designed to hang the front fender off the existing attachment points on the Bonneville’s lower yoke.
I hit a snag when the holes on the fender didn’t quite line up with the holes on the high-mount kit. Sam’s reasoning made perfect sense; the fender is bike-specific, so it’s tailored to the 17” front wheel on my ‘mag wheel’ Bonnie, giving it a tighter radius. Presumably, Bonnevilles with larger front wheels present less of a problem.
If I’d paid for the parts I would have sent them back. But in the end, some judicious filing brought everything together neatly. Ironically, I’m not sold on the overall look, so the Motone Shorty fender will probably end up moving to the original position.
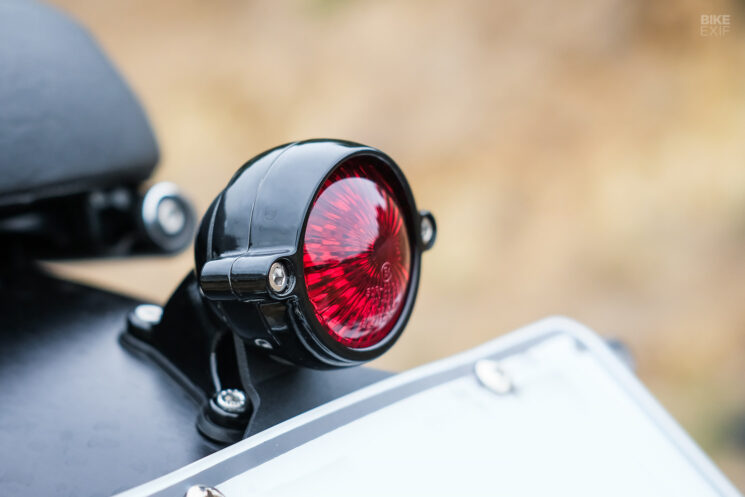
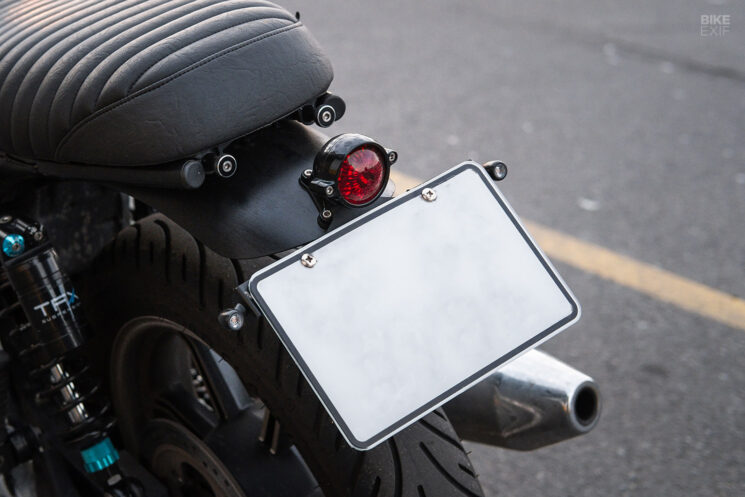
Motone Eldorado LED taillight Motone’s overarching strategy is to develop an ecosystem of parts that work together seamlessly—and nowhere is this more evident than with their taillights. Although Motone offers myriad taillight designs, they all share the same mounting system—which, in turn, fits all of their fenders.
The setup on my Bonneville is centered around Motone’s Eldorado LED taillight, chosen for its minimalist retro aesthetic. It’s accompanied by a Motone license plate bracket, and a plug-and-play wiring harness for this specific model of bike, negating the need for any wiring work.
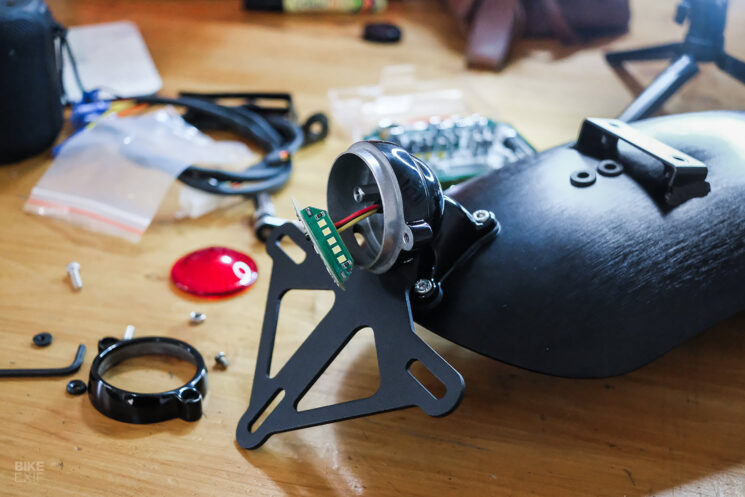
The Eldorado’s cast aluminum casing measures 78 mm [about 3”] across, with its lens occupying 50 mm [about 2”] of that space. It comes in a handful of color options, and can be bought with or without Motone’s standardized mounting kit, which includes the mounting plate, a rubber base, a set of fasteners, and the requisite Allen key. Attaching just the light is a breeze—but pairing it with the rest of the accouterments takes a little more finagling.
First, you need to disassemble the taillight housing and gingerly unscrew the circuit board inside it. Then you need to coax the wiring out of the back of the housing, slip Motone’s steel license plate bracket in place, and reassemble everything. (And if, like me, you’re not paying attention to the wiring, you need to repeat the process two or three times.)
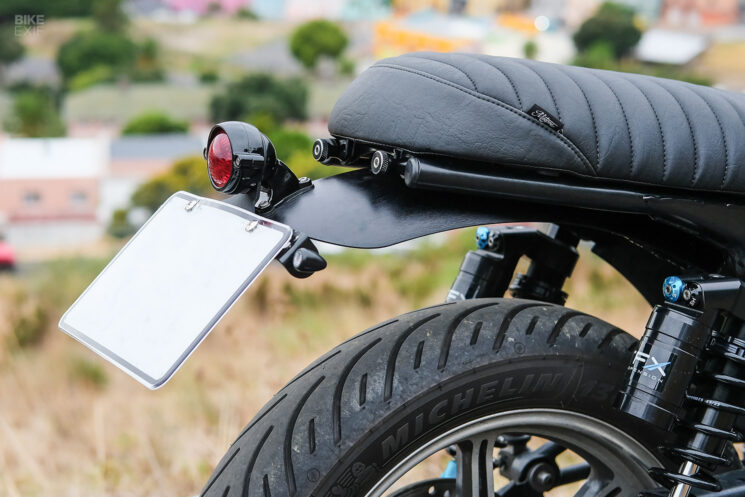
The whole thing then attaches to the rear fender as a single piece, making for a very tidy tail. The Bonneville-specific wiring harness is a boon, since it plugs directly into the OEM connector and dramatically shortens the amount of wiring at the back of the bike. Once plugged in, the Eldorado’s running and brake light LEDs are more than bright enough, and there’s a cutout on the light’s underside to illuminate the license plate.
(Motone also sent over a pair of mounts that let you attach turn signals to the license plate holder. They were too short to clear my broad South African license plate though, so I replaced them with a pair of metal tabs from my parts bin.)
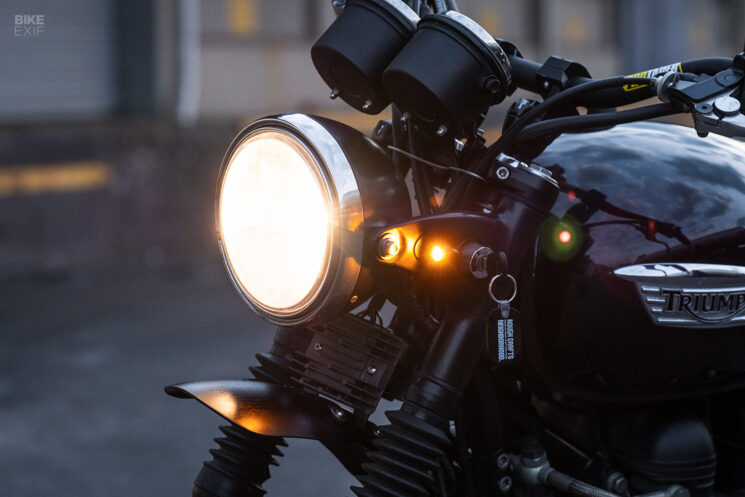
Motone Pico LED turn signals Finishing off the redesign of my Bonneville’s tail section is a pair of handsome Motone Pico LED turn signals. Sporting a traditional bullet design in a tiny aluminum housing, they’re as classy as they are bright. They’re also street-legal in the UK, despite their size.
But what’s impressive, is how thoughtfully the Pico turn signals have been put together. Their wires are neatly encased in braided housings, and their nuts and washers are slotted, making it easier to slip them over the wiring.
Once again, Motone supplied air-cooled Bonneville-specific wiring adaptors to take the guesswork out of hooking the Pico turn signals up (although I still managed to get it wrong the first time). The adaptors wear Triumph-style plugs on one end, and bullet connectors to match those on the turn signals on the other. With everything connected, rubber sleeves can be slipped over the locking nuts to protect the wiring.
The only trick with these pint-sized turn signals was figuring out where to mount them. The rear turn signals sat nicely on the Motone taillight assembly, but the front turn signals struggled to poke out from where the Bonneville’s original blinkers sat; recessed mounting points on the headlight ears. So I had to backyard engineer a ‘spacer’ to position them slightly wider.
Motone Customs | Instagram | Facebook | Images by Wes Reyneke
Full disclosure As is standard practice with our riding gear and parts reviews, Motone sent these parts free of charge. They haven’t paid us for this review, nor do they expect me to only say fluffy things about their products. As always, our opinions are unbiased and our own.